Choose Happy SVG: A Designer’s Embroidery Review
First Impressions: The Mood of Choose Happy
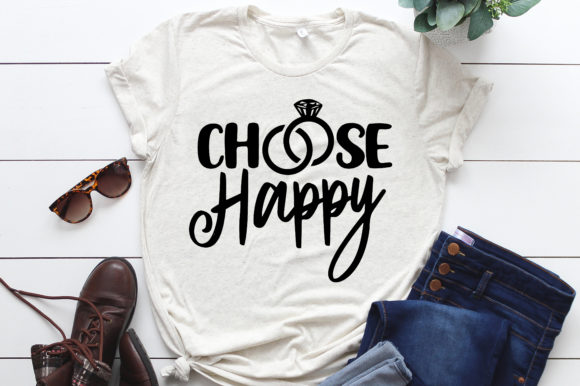
When I first opened the Choose Happy SVG file, I wasn’t looking at a design—I was reading a feeling. The phrase itself is a quiet instruction, and the visual treatment carries that same gentle energy without shouting. The lettering sits in a balanced, forward-moving rhythm, with just enough personality to feel handmade but not so much that it becomes trendy or fleeting. It’s the kind of sentiment that fits a quiet morning, a thoughtful gift, or a small shop owner trying to sell more than a product—selling a moment of lightness.
As an embroidery designer, I immediately begin translating that mood into thread. The shape of the words, the spacing, the way the loops and strokes flow—these are the things that determine whether a design will stitch out beautifully or become a frustrating mess of tight corners and skipped stitches. In this SVG, the typography is clean and open, which is a relief. Beginner-friendly shapes, smooth curves, and a lack of overly thin hairlines tell me that digitizing this into a machine embroidery design won’t be a battle. The high-resolution file gives me crisp edges, so even when I zoom in to trace the outlines, I’m not guessing at what belongs where. That matters.
A Real Test: Imagining This SVG on a Linen Tote
Let me walk you through a scenario I actually had in mind while reviewing this file. I was preparing a small run of custom embroidered tote bags for a local boutique. The client wanted something uplifting, not overly feminine, and neutral enough to sell alongside linen aprons and simple cotton market bags. I pulled up the Choose Happy SVG and immediately saw it sitting centered on a natural linen tote, stitched in a soft mustard thread with a matte finish.
That’s the kind of product this design belongs to. It’s not trying to be a festival graphic or a loud statement piece. It’s a quiet, everyday reminder. I could picture customers picking it up, running their fingers over the texture of the stitches, and smiling. The layout is compact but not tight, so it doesn’t demand a huge hoop. I could easily fit it into a 4x4 or 5x7 hoop without losing the integrity of the lettering—this is a critical detail when you’re managing production time and hooping on something like a tote bag with a sewn-in lining.
I also considered how it would look after washing. The phrase Choose Happy doesn’t have intricate serifs or dramatic thick-thin contrast that deteriorate after repeated laundering. For a handmade product that’s meant to be used, not just displayed, that’s a thoughtful design trait. I’ll take clean, durable shapes over delicate, fussy details any day.
Where Choose Happy Shines in Embroidery
This design lends itself beautifully to a range of embroidery projects that feel warm and personal. I can see it working beautifully on:
- Custom apparel like soft sweatshirts and relaxed-fit t-shirts, where the message sits at the heart or left chest and feels like a personal mantra.
- Baby embroidery—a tiny version on a knit onesie or a baby blanket, paired with a simple floral or cloud motif, becomes a gentle affirmation for a nursery.
- Kitchen textiles such as tea towels and aprons, stitched in a single color that complements rustic or modern farmhouse décor.
- Tote bags and canvas pouches, giving a boutique feel to a simple accessory.
- Embroidered patches—the design’s simplicity means it can be digitized as a patch with a neat satin-stitch border, ready to be sewn onto jackets, caps, or backpacks.
Because the file is a high-resolution SVG, it also serves as a strong digital embroidery file starting point for creating printable mockups. I’ve used it to quickly generate a realistic preview of how the finished stitch-out would look on a hoodie or a mug, which helps buyers connect with the product before I even thread a needle. That’s a practical win for Etsy sellers and small shop products where a clean listing image can make the sale.
Reading the Details: What Stitches Love and What They Don’t
When I evaluate a graphic template like this for embroidery, I’m not just looking at the art—I’m mentally running a stitch simulation. The Choose Happy SVG has a lot going for it, but let’s talk about where a digitizer needs to pay attention.
The letterforms are mostly smooth, which means they’ll digitize well as a combination of satin stitch and fill stitch depending on the size. If I’m going small, I’d lean into a satin stitch with a neat underlay to keep the edges crisp. The spacing between letters is generous, so I’m not worried about the thread bridging or pulling the fabric into a puckered mess. Still, I’d be cautious on textured fabrics like terry cloth or loosely woven linen—the open areas between characters could swallow the definition if the stitch density isn’t adjusted.
I’d also avoid using this on extremely stretchy fabric without a solid cutaway stabilizer. The design’s width and the gentle curves might distort if the fabric moves during stitching. A quick test on scrap fabric with the same stretch and weight is non-negotiable. I always check how the thread colors contrast with the background, too. On a dark sweatshirt, a light pastel thread might look dreamy, but the same shade on a cream tote could disappear. I’d recommend mocking up the design in black and white before committing to a color palette—it’s a trick I’ve learned from years of fixing mistakes late at night.
How This Design Lifts the Handmade Product
A well-chosen graphic does more than decorate. It communicates value. When a customer sees Choose Happy stitched onto a gift item, the message does half the selling. It’s instantly relatable, and it creates a small emotional hook. I’ve noticed that products with short, affirmative phrases tend to get more engagement, whether it’s at a craft fair or in an online shop. This isn’t a generic “live laugh love” repetition—it’s a quiet, personal reminder that feels genuine.
For craft businesses and creative entrepreneurs, this design can become a brand anchor. You can use it across a product line—mugs via sublimation, hoodies via iron-on printing, and tote bags via embroidery—and still maintain a consistent voice. The fact that the same SVG file supports those different applications means you’re not hunting for vector art when a customer asks for a tumbler instead of a tee. That’s the kind of flexibility that makes graphics truly valuable.
I also appreciate that the design doesn’t demand a specific season or holiday. It works year-round, which means you’re not sitting on unsold stock after December. This is a design you can list in January, gift in May, and stitch onto a fall sweatshirt without missing a beat. That kind of longevity is a quiet gift for small shop product planning.
Smart Practices Before You Stitch
Before you load this file into your digitizing software, a few practical steps will keep your embroidery project smooth and professional:
- Test on scrap fabric first. I can’t emphasize this enough. Use the same fabric type and stabilizer you plan to use for the final piece. Even a simple design can reveal surprises when thread tension meets texture.
- Check the stitch density. When you digitize the SVG, pay attention to the density settings. Too dense, and you risk puckering; too light, and the design looks thin and amateurish. A balanced underlay will make a world of difference.
- Confirm your hoop size. Measure the design at the size you want to stitch. The SVG is scalable, but your embroidery machine’s hoop isn’t. I’ve seen too many people digitize a beautiful design only to realize it doesn’t fit their largest hoop.
- Review the fine details. Even though the file is high resolution, look closely at the joins and stroke endings. Sometimes a tiny curved tail can become a stitch tangle in a small rendition. Adjust the digitized path if needed rather than forcing it.
- Test on light and dark fabrics. The same thread color will read differently. A soft coral on white linen is charming; on charcoal it might look muddy. Always test both backgrounds if you plan to offer a range.
- Use a proper stabilizer. For apparel, a medium-weight cutaway is my go-to. For a tote, a tear-away with a bit of temporary adhesive spray keeps the fabric from shifting. Don’t skip this step—it’s the backbone of a crisp stitch-out.
- Understand the licensing before you sell. The description says the digital clip art files can be used for T-shirts, tumblers, mugs, and hoodies, which strongly suggests commercial use on physical products. Still, I always recommend reaching out to the seller or reading the license document to confirm that you can sell the finished items without any extra restrictions. Being clear on this protects your craft business and keeps your customer relationships honest.
Final Thoughts from My Worktable
I came to the Choose Happy SVG expecting a simple phrase, and I left with a versatile design asset that I’d confidently use in a range of personalized gifts and boutique items. Its strength lies in its restraint—no excessive flourishes, no tricky details, just a clean, uplifting message that stitches out beautifully when you treat it with the care any good embroidery design deserves.
For embroidery designers and handmade shop owners, this is the kind of graphic that quietly earns its place in your library. It won’t be the flashiest file you own, but it will be one you reach for again and again, whether you’re making a last-minute gift, restocking your best-selling tote, or testing a new thread color on a spring apron. In a world full of complicated designs, sometimes the simplest ones make the best stitches. And that’s exactly what happy feels like.